> ## Documentation Index
> Fetch the complete documentation index at: https://docs.pixldata.com/llms.txt
> Use this file to discover all available pages before exploring further.
# Creating a Project
> Create a labeling project in PixlHub: pick the right tool type, understand what gets provisioned, and set yourself up before the first asset is uploaded.
A project is the unit everything else in PixlHub hangs off: its assets, its label schema, its workflow, its team and its exports. Creating one takes thirty seconds; picking the right tool type deserves slightly more thought, because it decides which annotation editor your team will live in.
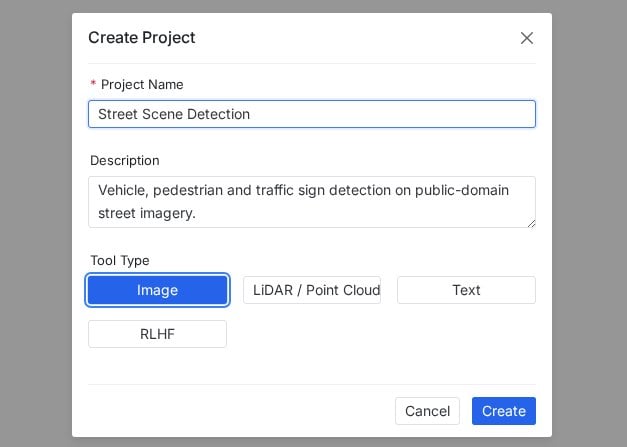
Go to **Projects** and click **New Project** (also available from the Dashboard's Quick Actions).
The name appears everywhere your team works, so favor descriptive over clever: "Street Scene Detection" beats "CV-Test-2". The description is optional but shows on the project header, a good place for one sentence about scope.
This selects the editor for every task in the project:
| Tool type | Editor you get |
| ----------------------- | ----------------------------------------------------------------- |
| **Image** | The 2D canvas: boxes, polygons, points, lines, freeform, comments |
| **LiDAR / Point Cloud** | The 3D point cloud environment |
| **Text** | Text annotation surface for classification and span labeling |
| **RLHF** | Response comparison and feedback workflows for LLM data |
PixlHub provisions the project with a default workflow (Label, then Review, then Done) and opens the project overview.
 Tool type is a structural choice, not a setting: it shapes the editor and task flow for the whole project. Mixed datasets (say, images plus text) belong in separate projects.
## What a new project contains
Straight after creation you land on the project header with nine tabs. You will touch three of them before any labeling happens:
* **[Label Schema](/guides/essentials/label-schema)**, to define your classes before anyone draws a shape.
* **[Assets](/guides/essentials/assets)**, to upload the data; each asset automatically becomes a task.
* **[Workflow](/guides/projects/workflow)**, already running the default Label, Review, Done pipeline, editable when you need more.
The remaining tabs earn their keep once work starts: Tasks for queue management, Performance for throughput, Comments for discussion, Export for getting data out, and Settings for the project's own configuration.
## Naming conventions that age well
Teams running many projects converge on the same pattern: what the data is plus what the model needs, for example "Retail Shelf Audit" or "Highway LiDAR, Q3 batch". Status words in names ("final", "new", "v2-fixed") rot within a week; the workflow and task statuses already track state for you.
## Next steps
Classes, colors, hotkeys and attributes, before the first annotation.
Formats, limits, batches, and what happens after upload.
Tool type is a structural choice, not a setting: it shapes the editor and task flow for the whole project. Mixed datasets (say, images plus text) belong in separate projects.
## What a new project contains
Straight after creation you land on the project header with nine tabs. You will touch three of them before any labeling happens:
* **[Label Schema](/guides/essentials/label-schema)**, to define your classes before anyone draws a shape.
* **[Assets](/guides/essentials/assets)**, to upload the data; each asset automatically becomes a task.
* **[Workflow](/guides/projects/workflow)**, already running the default Label, Review, Done pipeline, editable when you need more.
The remaining tabs earn their keep once work starts: Tasks for queue management, Performance for throughput, Comments for discussion, Export for getting data out, and Settings for the project's own configuration.
## Naming conventions that age well
Teams running many projects converge on the same pattern: what the data is plus what the model needs, for example "Retail Shelf Audit" or "Highway LiDAR, Q3 batch". Status words in names ("final", "new", "v2-fixed") rot within a week; the workflow and task statuses already track state for you.
## Next steps
Classes, colors, hotkeys and attributes, before the first annotation.
Formats, limits, batches, and what happens after upload.