
The Bounding Box tool is available in image projects. Reviewers see the same boxes read-only with accept and reject controls instead of drawing tools.
Choose a box variant
The tool ships in three variants, selectable from the canvas toolbar when Bounding Box is active:Draw a box
1
Arm the class
Press the class hotkey (shown next to each class in the left panel) or click the class name. Whatever you draw next takes this class.
2
Select the tool
Click the Bounding Box icon in the floating palette if it is not already active.
3
Click and drag
Press the mouse at one corner of the object, drag to the opposite corner, release. The status bar shows live width and height in pixels while you drag, and the finished box appears with its class label and a new entry in Object Instances.
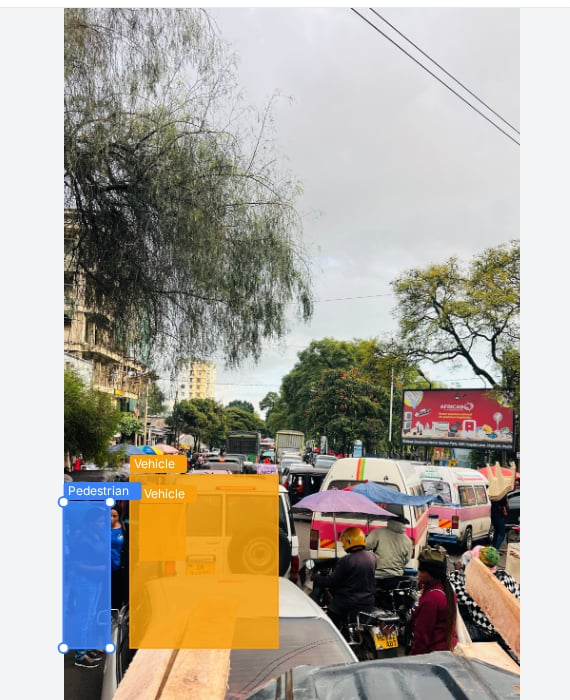
Boxes drawn with class hotkeys: the class chip renders on each box and every instance gets an ID.
Edit an existing box
Switch to the Select tool, then click any box:- Move by dragging the body of the box.
- Resize with the corner and edge handles.
- Reclassify by pressing a different class hotkey while the box is selected.
- Delete with the Delete key, or from the right-click menu.
Work precisely
Tight boxes make better training data than fast ones. Three habits that pay off:- Zoom before you draw. Use the scroll wheel or the zoom controls, draw at 200 percent for small or distant objects, then Fit to Screen to move on.
- Watch the pixel readout. The status bar shows exact dimensions while dragging, which makes consistent minimum-size rules enforceable rather than aspirational.
- Lock finished objects. In dense scenes, lock completed boxes from the Object Instances panel so a stray drag cannot nudge them.
Frequently asked questions
Can I draw a box that extends past the image edge?
Can I draw a box that extends past the image edge?
Boxes clamp to the image bounds. For objects cut off by the frame, box the visible portion and follow your project’s occlusion convention for attributes.
How do I change the box colors or label text size?
How do I change the box colors or label text size?
Open Canvas Settings in the right rail. Border widths, label rendering and related display options are configurable per project and do not affect the stored annotations.
Is there a fastest possible loop?
Is there a fastest possible loop?
Hotkey, drag, hotkey, drag. Arm the class with a number key, draw, and only return to the panels when the scene is done. Combined with Copy from previous task on similar frames, this is the highest-throughput pattern in the editor.
Next steps
Image annotation editor
The full editor tour: panels, palette, saving and submitting.
Polygon tool
When rectangles are not precise enough.