
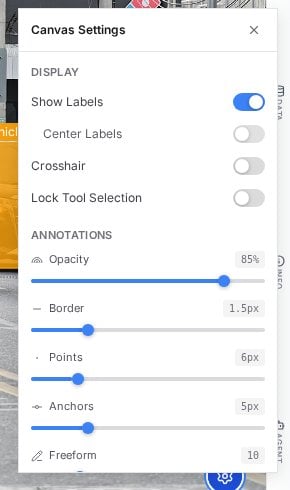
The Canvas Settings panel: display toggles on top, annotation rendering sliders below.
Display toggles
Annotation rendering
Five sliders control how shapes draw, all cosmetic and instant:- Opacity (default 85%) fills shape interiors; drop it when annotations hide the pixels you still need to judge.
- Border (1.5x) is stroke weight; heavier reads better on busy imagery, thinner on dense scenes.
- Points (6px) and Anchors (5px) size the point markers and the vertex handles on selected shapes.
- Freeform (10) controls freeform stroke rendering.
Settings are cosmetic only and apply per project, so your retail project and your street project can keep different tuning. Exports and stored annotations are untouched by any of them.
Combinations that work
- Dense scenes (shelves, crowds): opacity down to ~50%, border 1x, labels off while drawing, on while reviewing.
- Precision landmarking: crosshair on, zoom high, anchors a step larger.
- Screenshots and demos: center labels on, border 2x, opacity up; geometry reads instantly.
Next steps
Canvas toolbar & shortcuts
The view and history controls above the canvas.
Right drawer
The context tabs where this panel lives.